
Characteristics of the appliance
With the sandwich maker you will be able to toast sandwiches
with lling quickly. The sandwich maker allows you to cook
one or two slices of bread for toasting at the same time.
The cooking plates are divided into four triangular zones
and covered with a specially designed layer to prevent the
sandwiches from sticking to the cooking plate. The sandwich
maker has two indicators:
red: the red light indicates that the appliance has been –
connected to the mains supply,
green: you can use the appliance for toasting now. –
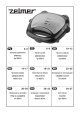
Features of your sandwich maker
1
Upper lid
2
Lower lid
3
Cooking plates
4
Catch
5
Red indicator
6
Green indicator
Before using for the rst time
Remove your sandwich maker from the packaging.
●
Make sure that the voltage shown on the rating plate of
●
the appliance corresponds to that in the mains supply.
Clean the inside of the sandwich maker with a slightly
●
damp cloth or paper towel.
Brush the cooking zones with a small amount of oil or
●
butter.
Pre-heat the sandwich maker for about 5 minutes with
●
the lid open to remove any remnants originating from the
manufacturing process.
When using the sandwich maker for the rst
time, with the cooking zones getting hotter
you may notice a ne smoke haze. It is not
dangerousnorisitasignthatyourappliance
is defective. The appliance should cease to
emitthehazeafterseveralcookingcycles.
Remove the plug from the mains socket, and allow the
●
sandwich maker to cool down fully.
When the appliance has cooled down, wipe the remnants
●
of oil away from the cooking plates with paper towel.
How to use and how your sandwich
maker works
1
Place your sandwich maker on a dry, even surface near
the mains socket.
2
Close and latch the toaster.
3
Plug the appliance into the mains socket. The red light
will come On.
4
Wait for about 3-4 minutes for the green indicator to
illuminate. The green light shows that the cooking plates
have reached the correct cooking temperature.
A
B
ThegreenindicatorwillcycleOnandOff.This
is a sign showing that the correct cooking
temperatureismaintained.
To getgolden brown sandwiches, spread the
outsideofbreadwithbutter.
5
Unlatch and open the toaster.
6
Place sandwiches on the lower cooking plate.
7
Close the lid carefully. If necessary, use a wooden
spatula to hold the sandwiches in place. If you cannot close
the lid properly, it means that the sandwiches are overlled,
and you need to remove some of the lling.
Do not force the lid down. This can damage
yoursandwichmaker.
Toasting time dependson your taste andthe
typeofbread.Sandwichesareusuallytoasted
forca.3-8minutes.Youcanunlatchandopen
thelidtodecideifyoustillwanttotoastyour
sandwiches.
Be careful. The appliance may generate hot
steamwhenoperating.Thehotsteammayalso
escapewhenyouopenthelid.Riskofburns!
8
Unlatch and open the lid.
Remove the toasted sandwiches.
●
Useawoodenspatulatoremovesandwiches
and remnants from the sandwich maker.
Sharpand/ormetallicobjectsmaydamagethe
cookingplates.
Thecookingplatesarehot.Beverycarefulto
avoidburns.
9
When you have nished the toasting, switch the
appliance off, and allow it to cool down fully. Remove the
plug from the mains socket to switch the appliance off.
Shortlyafterthetoasting,thellingmaystillbe
hot.Wheneating,takespecialcaretoavoidthe
riskofburns.
Cleaning and maintenance of sandwich maker
Your sandwich maker does not require any specic
●
maintenance.
Keep and store the sandwich maker clean, as it has
●
contact with food.
Unplug the appliance from the mains socket before
●
cleaning, and allow it to cool down fully.
Wipe your sandwich maker with a soft, slightly damp
●
cloth, and then dry it with a soft, clean cloth.
Do not use cleaners that may scratch or damage external
●
surfaces and a protective layer of the heating plates.


 England
  Deutschland
  France
  Italia
  Polska
  United Kingdom
  Россия
  Nederland
  España
  Magyarország
  Sverige
  România
  Portugal
  Colombia
  Suomi
Suomi  New Zealand
  Česká republika
  Türkiye
  Danmark
  日本
日本